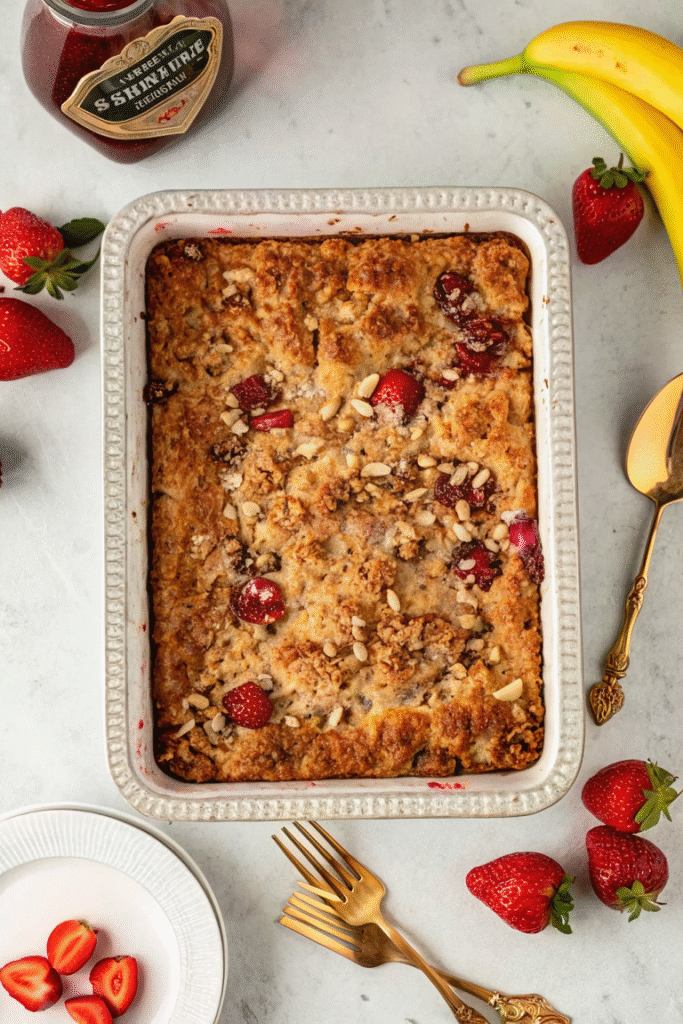
Tired of dry, crumbly gluten-free quick breads? Prepare to be amazed!
If you’ve ever attempted gluten-free baking, you know the struggle is real. Dense, gummy textures that stick to your teeth. Dry, crumbly loaves that fall apart at first bite. The disappointment of spending time and ingredients on something that just doesn’t deliver the comfort and satisfaction you’re craving.
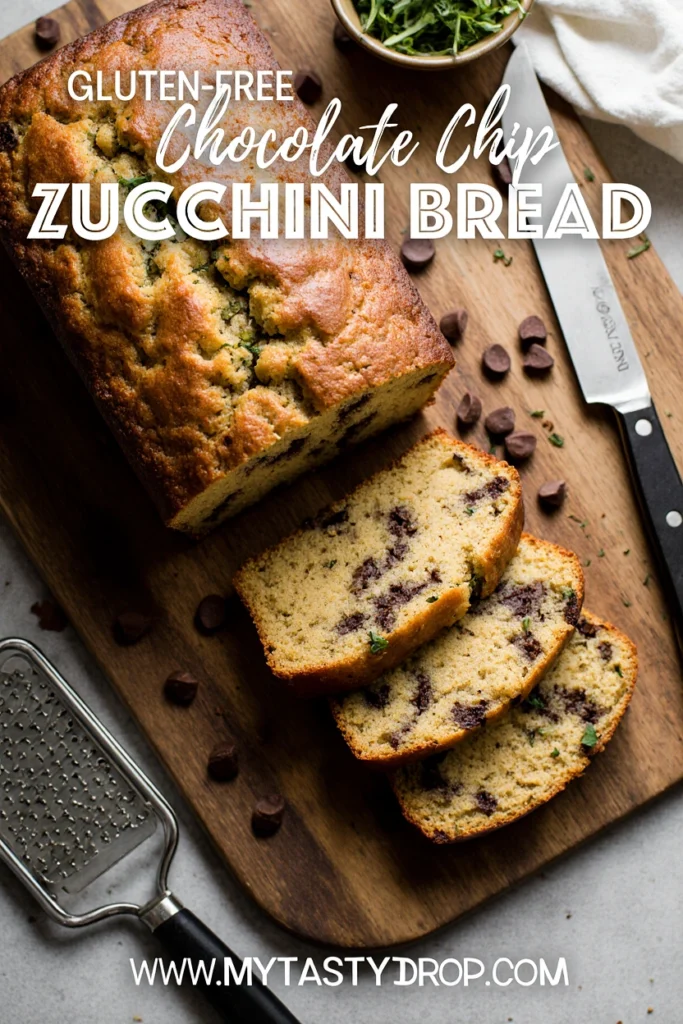
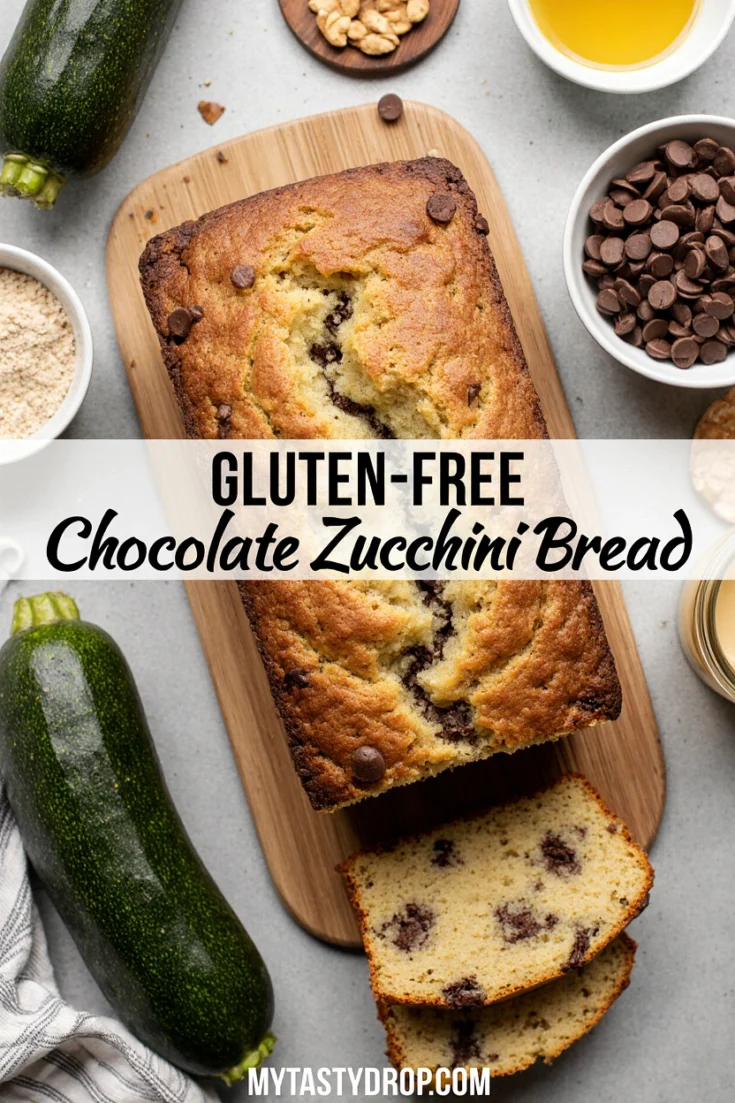
But what if I told you that this Gluten Free Chocolate Chip Zucchini Bread is about to change everything? This isn’t just another “good for gluten-free” recipe – it’s a genuinely incredible quick bread that happens to be gluten-free. We’re talking moist, tender, perfectly sweet, and unbelievably easy to make.
Why You’ll Love This Recipe:
Fresh zucchini creates incredible moisture and subtle veggie nutrition
Rich chocolate chips in every bite for pure indulgence
Perfect for any time – breakfast, snack, or dessert
Simple pantry ingredients you likely already have
Foolproof method designed specifically for gluten-free success
In this comprehensive guide, you’ll discover not just the recipe, but expert gluten-free baking tips, troubleshooting solutions, and creative variations that will make this your go-to moist gluten-free zucchini bread recipe.
Why This is Your NEW Favorite Gluten-Free Chocolate Chip Zucchini Bread
Unbeatable Texture That Actually Works
What sets this Best GF zucchini bread apart is the carefully calibrated ingredient ratios that create a supremely moist, tender crumb without any of that dreaded gummy texture. The secret lies in:
Precise moisture balance between wet ingredients and zucchini
Optimal flour-to-liquid ratio specifically formulated for gluten-free flour blends
Strategic ingredient temperatures that create proper emulsion
Controlled mixing technique that develops structure without overdoing it
Perfectly Balanced Flavor Profile
This isn’t just about avoiding gluten – it’s about creating something genuinely delicious. The recipe achieves:
Fresh zucchini brightness that adds moisture without overwhelming veggie taste
Rich chocolate satisfaction from perfectly distributed mini chips
Warm spice notes from cinnamon that complement without competing
Balanced sweetness that satisfies without being cloying
Foolproof Method for Guaranteed Success
Even if you’re new to gluten-free baking, this recipe sets you up for success with:
Crystal-clear step-by-step instructions with visual cues
Specific timing and temperature guidelines tailored for GF flour behavior
Built-in troubleshooting to prevent common pitfalls
Flexible adaptations for various dietary needs
Diet-Friendly Built-In Options
This versatile base recipe easily accommodates:
Dairy-free modifications with simple substitutions
Egg-free/vegan adaptations using proven replacers
Nut-free options for safe school and workplace treats
Reduced sugar variations for lighter indulgence
The Ultimate Gluten-Free Chocolate Chip Zucchini Bread Recipe
Recipe Information
Yield:
1 standard loaf (12 thick slices)
Prep Time:
15 minutes
Cook Time:
55-60 minutes
Total Time:
1 hour 20 minutes
Difficulty:
Easy
Ingredients
Wet Ingredients:
2 large eggs, room temperature
½ cup neutral oil (vegetable or canola)
¾ cup packed light brown sugar
1 teaspoon pure vanilla extract
¼ cup unsweetened applesauce
Dry Ingredients:
1¾ cups gluten-free flour blend (see recommendations below)
1½ cups fresh zucchini, grated and moisture squeezed out
¾ cup mini chocolate chips (plus extra for topping)
💡 Pro Tip: For best results, use King Arthur Measure for Measure or Bob’s Red Mill Gluten Free 1-to-1 Baking Flour. These blends are specifically formulated for consistent results in quick breads.
Equipment Needed:
9×5-inch loaf pan
Large mixing bowl
Medium mixing bowl
Wire whisk
Rubber spatula
Box grater or food processor
Clean kitchen towels or paper towels
Measuring cups and spoons
Step-by-Step Instructions
Preheat & Prep (5 minutes)
Preheat oven to 350°F (175°C)
Grease 9×5-inch loaf pan thoroughly or line with parchment paper
Place oven rack in center position
Prepare the Zucchini (5 minutes) ⭐ CRUCIAL STEP
Grate zucchini using large holes of box grater
Place grated zucchini in clean kitchen towel or several layers of paper towels
Squeeze firmly to remove excess moisture – you should extract at least 2-3 tablespoons of liquid
Set aside the squeezed zucchini
Mix Wet Ingredients (3 minutes)
In large bowl, whisk together eggs, oil, brown sugar, vanilla, and applesauce
Whisk until smooth and well combined
Combine Dry Ingredients (2 minutes)
In separate bowl, whisk together GF flour, baking soda, salt, cinnamon, and xanthan gum (if using)
Ensure no lumps remain
Bring It Together (3 minutes)
Add dry ingredients to wet ingredients
Gently fold together until JUST combined – don’t overmix!
Batter should look slightly lumpy; this is perfect
Add the Stars (2 minutes)
Fold in squeezed zucchini until evenly distributed
Gently fold in chocolate chips, reserving a few for topping
Into the Pan (1 minute)
Pour batter into prepared loaf pan
Gently level top with spatula
Sprinkle reserved chocolate chips on top
Bake to Perfection (55-60 minutes)
Bake for 55-60 minutes until:
Golden brown on top
Toothpick inserted in center comes out with just a few moist crumbs
Sides begin to pull slightly from pan
Cool Completely ⭐ ESSENTIAL FOR TEXTURE
Cool in pan for 15 minutes
Turn out onto wire rack
Cool completely before slicing (at least 1 hour) – this allows the crumb to fully set
Expert Gluten-Free Baking Tips for Foolproof Zucchini Bread
Understanding Your GF Flour Blend
Flour Blend
Why It Works
Best For
King Arthur Measure for Measure
Contains xanthan gum, finely milled
Consistent rise and texture
Bob’s Red Mill 1-to-1
Balanced blend, widely available
Great all-purpose option
Cup4Cup
Professional-grade blend
Premium texture results
The Role of Xanthan Gum:
Acts as gluten substitute to provide structure
Prevents crumbly, falling-apart texture
Most quality blends include it – check your label!
Why Weighing Flour Matters:
GF flours vary significantly in density
Cup measurements can vary by 20-30%
For ultimate precision: 1¾ cups GF flour = approximately 210g
The Zucchini Factor: Moisture Control is King!
Why Squeezing is Critical:
“In gluten-free baking, excess water is the enemy of good texture. Zucchini naturally contains about 95% water, and that extra moisture will create a gummy, dense result.”
How to Properly Squeeze Zucchini:
Grate zucchini into clean kitchen towel
Gather corners to create a “pouch”
Twist tightly and squeeze firmly over sink
Continue squeezing until very little liquid emerges
You should extract 2-4 tablespoons of liquid
Don’t Overmix! The Golden Rule of GF Baking
The Science Behind It:
Gluten-free flours contain more starch than wheat flour
Overmixing develops this starch excessively
Result: Dense, gummy, unpleasant texture
Visual Cues for Perfect Mixing:
✅ Batter looks slightly lumpy and rustic
✅ No dry flour streaks visible
✅ Ingredients just barely combined
❌ Smooth, completely uniform batter (overmixed!)
Room Temperature Ingredients: The Secret to Success
Why Temperature Matters:
Creates proper emulsion between wet ingredients
Ensures even distribution throughout batter
Prevents lumpy, separated mixture
Quick Temperature Tips:
Eggs: 30 minutes on counter or 5 minutes in warm water
Oil: Store at room temperature anyway
Applesauce: Remove from fridge 15 minutes before using
The Importance of Cooling Completely
Unlike traditional wheat-based breads, moist gluten-free zucchini bread continues to set and improve as it cools. Here’s why patience pays off:
Starch structure firms up during cooling
Moisture redistributes evenly throughout crumb
Texture transforms from potentially gummy to perfectly tender
Flavors meld and intensify
Pro Cooling Method:
Cool in pan 15 minutes (prevents breaking)
Turn out onto wire rack
Cool completely (minimum 1 hour)
For best texture, wrap and wait overnight
Troubleshooting Common Gluten-Free Zucchini Bread Problems
“Why is my gluten-free zucchini bread gummy/dense?”
Most Likely Causes & Solutions:
Problem
Solution
Overmixing batter
Mix only until ingredients just come together
Too much zucchini moisture
Squeeze zucchini more thoroughly
Wrong flour blend
Use recommended 1:1 baking blends
Incorrect ratios
Measure ingredients precisely, preferably by weight
“Why is my gluten-free zucchini bread dry/crumbly?”
Quick Fixes:
Add moisture: Extra tablespoon of oil or applesauce
Check flour blend: Some are more absorbent than others
Don’t overbake: Check doneness at 50 minutes
Storage matters: Wrap tightly to retain moisture
“Why did my bread sink in the middle?”
Common Culprits:
Undercooked center – bake 5-10 minutes longer
Too much leavening – measure baking soda precisely
Oven temperature fluctuations – use oven thermometer
Opening oven door too early – resist peeking until 45+ minutes
“My chocolate chips sank to the bottom!”
Prevention Strategy:
Toss chocolate chips with 1 teaspoon of your flour blend before folding into batter
This light coating helps them stay suspended during baking
Use mini chips rather than large chunks for better distribution
Delicious Variations & Adaptations
Dairy-Free Gluten-Free Zucchini Bread
Simple Swaps:
Replace oil with melted coconut oil (cooled slightly)
Use Enjoy Life mini dark chocolate chips (dairy-free)
Add 1 tablespoon non-dairy milk if batter seems thick
Tropical Twist: ⅓ cup mini coconut flakes + ¼ tsp almond extract
Different Formats
Gluten-Free Zucchini Muffins:
Divide batter among 12 muffin cups
Bake at 350°F for 18-22 minutes
Perfect for portion control and grab-and-go snacks
Mini Loaves:
Use 4 mini loaf pans (5.75″ x 3.25″)
Bake for 35-40 minutes
Ideal for gifting or freezing individual portions
Reduce Sugar Options
Natural Sweetener Swaps:
Replace ½ the brown sugar with unsweetened applesauce
Use coconut sugar (1:1 ratio, slightly less sweet)
Add stevia to taste if reducing sugar significantly
Consider sugar-free chocolate chips
Storage & Freezing Instructions
Room Temperature Storage
Method: Wrap tightly in plastic wrap or store in airtight container
Duration: 3-4 days maximum
Tip: Add slice of bread to container to maintain moisture
Refrigerator Storage
Method: Airtight container or wrapped loaf
Duration: Up to 1 week
Serving: Bring to room temperature or warm briefly in microwave
Freezing for Later
Whole Loaf:
Cool completely
Wrap tightly in plastic wrap
Place in freezer bag, removing air
Label with date
Freeze up to 3 months
Individual Slices:
Slice cooled bread
Place parchment between slices
Wrap bundle in plastic wrap
Freeze in labeled bag
Thaw individual slices as needed
Defrosting Tips:
Room temperature: 2-3 hours for whole loaf
Refrigerator: Overnight thawing (best texture)
Microwave: 30-second intervals for single slices
Frequently Asked Questions (FAQ)
Recipe Basics & Substitutions
Q: Can I use regular flour for this recipe? A: No, this recipe is specifically formulated for gluten-free flour blends. The ratios of wet to dry ingredients, leavening agents, and mixing methods are all calibrated for GF flour behavior. Regular wheat flour would require significant recipe modifications.
Q: What’s the best gluten-free flour blend to use? A: For consistently excellent results, I recommend King Arthur Measure for Measure or Bob’s Red Mill Gluten Free 1-to-1 Baking Flour. These blends are specifically designed for quick breads and contain the right balance of rice flour, starches, and binding agents.
Zucchini Preparation & Baking Techniques
Q: Do I have to squeeze the water out of the zucchini? A: Absolutely yes! This is the #1 most critical step for achieving proper texture in gluten-free baking. Excess moisture from zucchini will make your bread gummy and dense. Take the time to squeeze thoroughly – your texture depends on it.
Q: Can I use frozen zucchini? A: Yes, but with extra care! Thaw completely, then squeeze out moisture even more thoroughly than fresh zucchini. Frozen zucchini releases significantly more water, so you may need to squeeze multiple times.
Q: How do I know when my zucchini bread is done? A: Look for three signs: 1) Golden brown color on top, 2) Toothpick inserted in center comes out with just a few moist crumbs (not wet batter), and 3) Edges begin to pull slightly away from pan sides. Internal temperature should reach 200-205°F.
Texture & Make-Ahead Tips
Q: Why does my bread taste gritty? A: This usually indicates a flour blend with coarsely ground rice flour. Switch to a finer-milled blend like King Arthur or Cup4Cup. Some people are more sensitive to rice flour texture than others.
Q: Can I make this bread ahead of time? A: Absolutely! This Best GF zucchini bread actually improves after sitting overnight. The flavors meld and the texture becomes even more tender. It’s perfect for meal prep or entertaining.
Conclusion & Call to Action
There you have it – the ultimate Gluten Free Chocolate Chip Zucchini Bread that finally delivers on the promise of moist, tender, absolutely delicious gluten-free baking. No more settling for “good enough” when you can have genuinely incredible.
This recipe isn’t just about accommodating dietary restrictions; it’s about creating something so delicious that everyone will be asking for the recipe – gluten-free or not. The combination of fresh zucchini moisture, rich chocolate indulgence, and foolproof technique makes this a true winner for any occasion.
Ready to Transform Your Gluten-Free Baking?
🍞 Try this recipe today and discover why it’s becoming the go-to moist gluten-free zucchini bread for home bakers everywhere!
📸 Share your success! Tag us on social media with your beautiful loaf photos – we love seeing your creations and hearing about your favorite variations.
💬 Have questions or tips? Leave a comment below! Our community of gluten-free bakers is always happy to help troubleshoot or share modifications that worked for them.
⭐ Rate this recipe! Your feedback helps other bakers discover this gem and helps us continue creating reliable, delicious gluten-free recipes.
What’s Next?
If you loved this recipe, you might also enjoy our other gluten-free favorites:
Ultimate GF Banana Bread with streusel topping
Dairy-Free GF Blueberry Muffins
Best Ever GF Chocolate Brownies
Happy baking, and welcome to truly exceptional gluten-free treats that never compromise on flavor or texture! 🌟
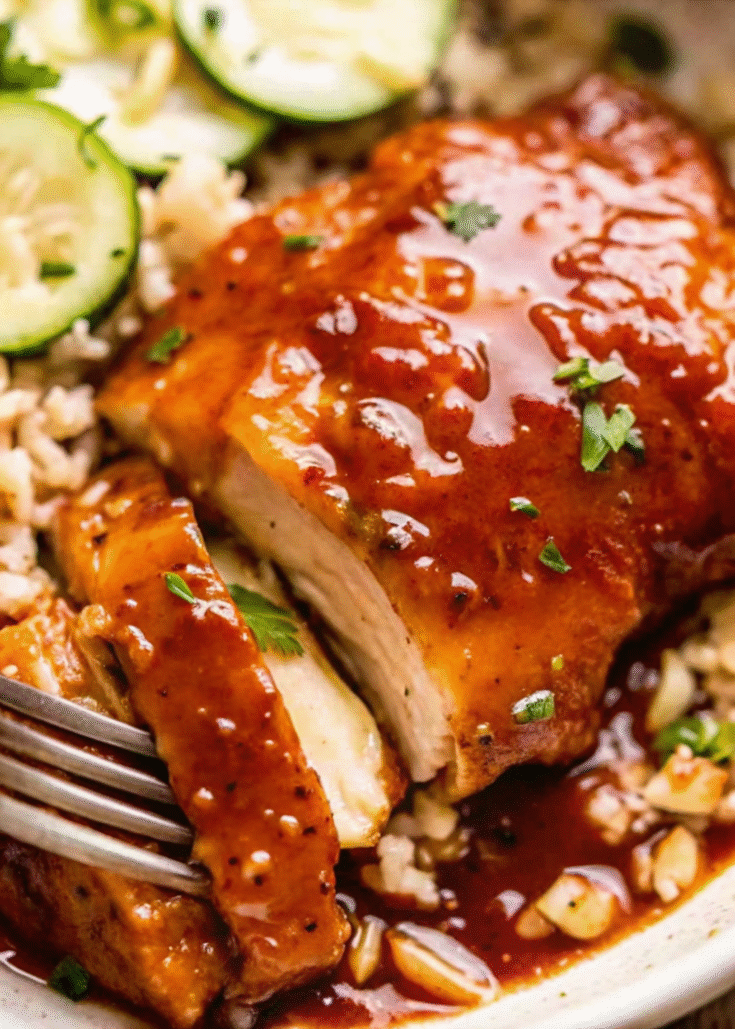
Honey Garlic Chicken is one of those genius weeknight recipes that checks every box: quick, flavorful, family-friendly, and versatile. With just a few basic ingredients—think garlic, soy sauce, honey, and vinegar—you can create a golden, sticky glaze that clings to juicy chicken breasts or thighs. The entire recipe comes together in under 15 minutes, making it a reliable staple for busy home cooks and flavor-seekers alike.
Whether you’re feeding a family, meal-prepping for the week, or just craving a sweet-and-savory sauce over rice, this honey garlic chicken delivers on all fronts. In this article, we’ll explore the full recipe, ingredient substitutions, serving tips, FAQs, history, and even how to adapt it for different diets or cooking methods.
🍽️ Use Case: Why You Need This Recipe
This recipe is a cornerstone for home cooks and content creators focused on:
Quick and easy weeknight meals
Budget-friendly family dinners
Healthy alternatives to takeout
Adaptable recipes for multiple proteins
Meal prep–friendly dishes
Pantry-based cooking inspiration
If you’re building a food blog, Pinterest board, or YouTube cooking series, Honey Garlic Chicken is one of the best recipes to feature due to its universal appeal and quick turnaround.
🧾 Ingredient List (Pantry Staples)
This dish relies on just a handful of affordable, everyday ingredients. Most households will already have these on hand.
Base Ingredients:
500 g (1 lb) boneless skinless chicken breast, halved horizontally
Salt and pepper
¼ cup all-purpose flour (for dusting)
3 ½ tbsp unsalted butter or 2 ½ tbsp olive oil
For the Honey Garlic Sauce:
2 garlic cloves, finely minced
1 ½ tbsp apple cider vinegar or white vinegar
1 tbsp soy sauce (light or all-purpose)
⅓ cup honey (or substitute maple syrup)
Optional Add-ins:
Red chili flakes (for heat)
Fresh chopped parsley or chives (for garnish)
Lemon juice or zest (for brightness)
🧑🍳 Step-by-Step Instructions
Step 1: Prepare the Chicken
Slice each chicken breast in half horizontally to create thinner, even pieces. Pat dry with paper towels and season both sides with salt and pepper. Lightly dredge each piece in flour—this will help the sauce adhere and create a golden crust when seared.
Step 2: Sear the Chicken
Heat butter or olive oil in a large skillet over medium-high heat. Add the chicken and sear for 3–4 minutes on each side, or until golden brown and fully cooked through. Remove the chicken to a plate and keep warm.
Step 3: Make the Sauce
In the same skillet, reduce heat to medium. Add minced garlic and sauté for 30 seconds or until fragrant. Add vinegar, soy sauce, and honey. Stir and bring to a simmer, allowing the sauce to thicken slightly (1–2 minutes).
Step 4: Coat and Serve
Return chicken to the pan and spoon the sauce over it, turning pieces to coat evenly. Let everything bubble together for another minute. Serve immediately with sauce drizzled on top.
🍚 Best Side Dishes
Honey Garlic Chicken is incredibly versatile and pairs well with both Western and Asian-style sides.
Asian-Inspired Pairings:
Steamed jasmine or basmati rice
Fried rice with vegetables
Stir-fried broccoli, bok choy, or green beans
Sesame noodles or soba
Western-Style Pairings:
Garlic mashed potatoes
Roasted root vegetables
Couscous or quinoa
Fresh salad with citrus vinaigrette
🍱 Meal Prep & Storage Tips
Meal prep: Double the recipe and store in airtight containers for up to 4 days.
Fridge: Keep leftovers in the fridge for 3–4 days.
Freezer: Freeze in meal portions for up to 2 months. Thaw and reheat gently on the stove.
Reheat: Warm in a covered skillet with a splash of water to loosen the sauce.
🔄 Variations & Substitutions
For Different Proteins:
Chicken thighs: Juicier, more flavorful, and less prone to overcooking.
Pork chops: Use boneless for quicker cooking.
Shrimp or prawns: Cook for only 2 minutes per side.
Tofu: Press firm tofu and pan-sear for a plant-based alternative.
For Special Diets:
Gluten-Free: Use cornstarch or gluten-free flour blend instead of wheat flour.
Dairy-Free: Use olive oil or vegan butter.
Low-Sodium: Use low-sodium soy sauce or coconut aminos.
Vegetarian/Vegan: Swap chicken with tofu or tempeh.
🔥 Pro Cooking Tips
Use a cast iron or stainless steel skillet for the best sear.
Don’t crowd the pan; cook in batches if necessary.
Add the garlic after removing the chicken to avoid burning.
Let the sauce bubble and reduce—don’t add the chicken back too soon or it won’t glaze properly.
For extra flavor, deglaze the pan with a splash of white wine before adding honey.
📖 History & Inspiration
While the exact origin of honey garlic sauce isn’t pinned to one culture, its flavor profile borrows from both East Asian and North American traditions. Soy sauce and garlic hint at Chinese cooking, while the use of honey and vinegar nod to Western pan sauces.
The method of pan-searing floured chicken and finishing in a glaze is a technique that dates back to French and Southern cooking traditions. The global fusion makes this recipe universally loved.
❓ Frequently Asked Questions
Can I make this in an air fryer?
You can air fry the chicken at 375°F (190°C) for 10–12 minutes, flipping halfway. Warm the sauce separately on the stove and coat the chicken afterward.
Can I bake it?
Yes. Bake floured chicken at 400°F (200°C) for 20 minutes. Heat sauce on stovetop and combine after baking.
What if I don’t have apple cider vinegar?
White vinegar, rice vinegar, or even lemon juice work as substitutes. Avoid balsamic—it’s too sweet for this dish.
Can I add vegetables?
Absolutely! Try sautéing bell peppers, zucchini, or mushrooms with the garlic, then proceed with the sauce.
🧪 Nutritional Breakdown (Per Serving Estimate)
Nutrient
Amount
Calories
320–350 kcal
Protein
28–32 g
Carbs
20–25 g
Sugar
~18 g (from honey)
Fat
12–15 g
Sodium
~400–600 mg
Honey Garlic Chicken
Prep Time5 minutes
Cook Time10 minutes
Additional Time2 minutes
Total Time2 minutes
Ingredients
500 g chicken breast, sliced and seasoned
Salt, pepper, flour for coating
3 ½ tbsp butter or 2 ½ tbsp olive oil
2 garlic cloves, minced
1 ½ tbsp apple cider vinegar
1 tbsp soy sauce
⅓ cup honey
Instructions
Coat chicken in flour, season.
Sear in hot skillet for 3–4 minutes per side. Remove.
Sauté garlic, then add vinegar, soy sauce, and honey. Simmer.
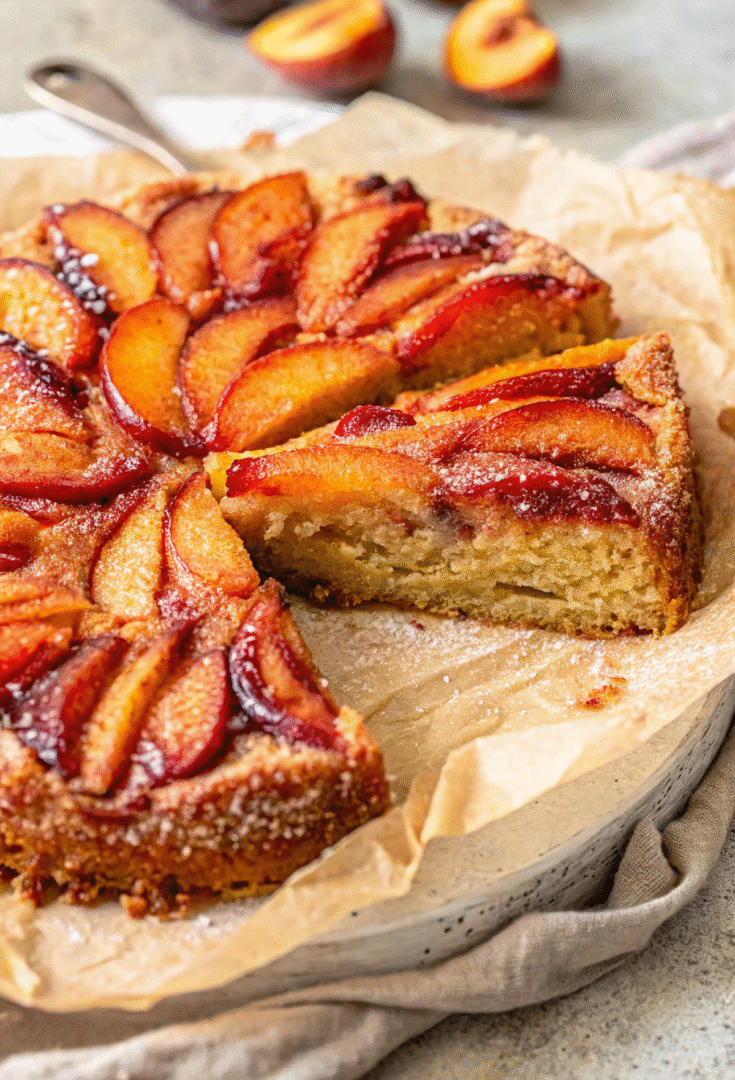
Peaches, bourbon, and caramelized cake—could there be a better combination? This Bourbon Peach Upside-Down Cake captures everything we love about summer desserts. Juicy peaches are transformed into a glossy, amber crown sitting atop a warm, soft, bourbon-kissed cake. It’s one of those desserts that looks stunning straight from the pan and tastes even better than it looks. Whether you’re baking for a summer cookout or just want to use up that basket of fresh peaches, this cake brings rustic charm and gourmet flavor together in one show-stopping bite.
🍑 Why This Recipe Works
This cake is more than just pretty—it’s thoughtfully balanced for flavor, texture, and visual appeal.
Fresh peach slices caramelize in a quick bourbon-butter-sugar glaze while baking.
The cake underneath is moist and fluffy, using almond flour for tenderness and a hint of spice.
It flips beautifully for that classic upside-down effect—revealing a golden mosaic of fruit and glaze.
Bourbon adds richness, depth, and a hint of smoky warmth.
🧾 Ingredients Breakdown
For the Peach-Bourbon Topping:
4 to 5 ripe peaches, thinly sliced (leave skins on for visual texture and color)
½ cup granulated sugar
¼ cup unsalted butter
1 tbsp bourbon (or more for a deeper kick)
1 tbsp lemon juice (to balance sweetness)
For the Cake Batter:
½ cup unsalted butter, room temperature
¾ cup granulated sugar
2 large eggs
1 tsp vanilla extract
1 cup all-purpose flour
¼ cup almond flour (adds moisture and a soft crumb)
1 ½ tsp baking powder
¼ tsp salt
¼ tsp ground cinnamon
½ cup whole milk
🍰 Step-by-Step Instructions
1. Prepare the Pan
Grease a 9-inch round cake pan generously. Line the bottom with parchment paper for easy release and re-grease over the paper. Avoid using a springform pan—it may leak during baking.
2. Make the Bourbon Caramel
In a small saucepan, melt butter and sugar over medium heat. Let it bubble gently without stirring until the sugar is dissolved and turns a light amber. Remove from heat and stir in the bourbon and lemon juice. Carefully pour the caramel into the prepared pan.
3. Arrange the Peaches
Fan the peach slices in a concentric circle over the caramel. Overlap the slices slightly and work from the center outwards. This step makes the top of your cake visually stunning once flipped.
4. Mix the Cake Batter
Cream together the softened butter and sugar until light and fluffy (about 2–3 minutes). Add eggs one at a time, mixing well after each. Stir in vanilla. In a separate bowl, combine flours, baking powder, cinnamon, and salt. Alternate adding the dry ingredients and milk to the wet, beginning and ending with the dry.
5. Bake the Cake
Carefully spoon the batter over the peaches and caramel, smoothing out the top. Bake at 350°F (175°C) for 35–40 minutes, or until a toothpick inserted into the center comes out clean.
6. Cool and Invert
Allow the cake to rest in the pan for 15–20 minutes after baking. Run a knife around the edges, then place a plate over the pan and flip carefully. Let gravity do its work. Remove the pan slowly to reveal your glossy peach crown.
🎉 Serving Suggestions
Serve warm with a scoop of vanilla ice cream or a dollop of whipped cream.
For brunch, pair with strong coffee and drizzle with extra bourbon glaze.
Add chopped pecans or walnuts over the caramel layer before baking for crunch.
🌿 Variations & Substitutions
Variation
Substitute
Alcohol-Free
Use peach nectar or apple juice instead of bourbon
Gluten-Free
Replace all-purpose flour with 1:1 gluten-free blend
Dairy-Free
Use vegan butter and almond or oat milk
Spiced
Add nutmeg or cardamom for a deeper profile
Upside-Down Muffins
Divide peaches and caramel into muffin tins for single servings
🍽 Storage and Reheating
Room Temperature: Store in an airtight container for up to 2 days.
Refrigerator: Store up to 5 days. Reheat slices in the microwave for 20–30 seconds.
Freezer: Wrap tightly and freeze for up to 2 months. Thaw in the fridge overnight and warm before serving.
🔪 Expert Tips for Perfect Results
Don’t overbake: The peaches will dry out if overcooked. Begin checking at the 30-minute mark.
Use ripe but firm peaches: Too ripe and they’ll fall apart; too firm and they won’t soften.
Don’t skip the parchment: It’s essential for clean release after flipping.
Pour caramel evenly: Uneven caramel can create patches where peaches won’t stick.
💬 Frequently Asked Questions (FAQ)
Can I use canned peaches?
Yes, but drain thoroughly and pat dry. Fresh peaches offer better flavor and texture.
What kind of bourbon works best?
Choose a mid-range bourbon with caramel, vanilla, and oak notes. Avoid anything overly smoky or spiced.
Can I make this ahead?
Absolutely. Bake the night before, cool completely, and invert. Store covered at room temp.
Can I use a bundt pan?
Upside-down cakes release best from flat pans. Bundt pans tend to trap fruit and caramel.
📖 History of Upside-Down Cakes
Upside-down cakes originated with cast-iron cooking and were first popularized with pineapples in the 1920s. This rustic method of layering fruit on the bottom and cake batter on top has since expanded to include seasonal fruits like apples, cherries, and now—bourbon-glazed peaches. The method remains a nostalgic nod to Southern kitchens and home-baked hospitality.
This Bourbon Peach Upside-Down Cake delivers a dessert experience that feels both nostalgic and elevated. With juicy peaches caramelized in a rich bourbon glaze and a soft almond-kissed cake beneath, each bite is summer on a plate. Whether you serve it at a garden party or a quiet weekend brunch, this cake is sure to impress—no frosting needed.
Bourbon Peach Upside-Down Cake
A summer dessert featuring caramelized peaches, bourbon glaze, and soft cake—easy, elegant, and irresistibly good.
Prep Time25 minutes
Cook Time35 minutes
Additional Time10 minutes
Total Time1 hour10 minutes
Ingredients
4 to 5 ripe peaches, thinly sliced (leave skins on for visual texture and color)
½ cup granulated sugar
¼ cup unsalted butter
1 tbsp bourbon (or more for a deeper kick)
1 tbsp lemon juice (to balance sweetness)
For the Cake Batter:
½ cup unsalted butter, room temperature
¾ cup granulated sugar
2 large eggs
1 tsp vanilla extract
1 cup all-purpose flour
¼ cup almond flour (adds moisture and a soft crumb)
1 ½ tsp baking powder
¼ tsp salt
¼ tsp ground cinnamon
½ cup whole milk
Instructions
1.Prepare the Pan
Grease a 9-inch round cake pan generously. Line the bottom with parchment paper for easy release and re-grease over the paper. Avoid using a springform pan—it may leak during baking.
2. Make the Bourbon Caramel
In a small saucepan, melt butter and sugar over medium heat. Let it bubble gently without stirring until the sugar is dissolved and turns a light amber. Remove from heat and stir in the bourbon and lemon juice. Carefully pour the caramel into the prepared pan.
3. Arrange the Peaches
Fan the peach slices in a concentric circle over the caramel. Overlap the slices slightly and work from the center outwards. This step makes the top of your cake visually stunning once flipped.
4. Mix the Cake Batter
Cream together the softened butter and sugar until light and fluffy (about 2–3 minutes). Add eggs one at a time, mixing well after each. Stir in vanilla. In a separate bowl, combine flours, baking powder, cinnamon, and salt. Alternate adding the dry ingredients and milk to the wet, beginning and ending with the dry.
5. Bake the Cake
Carefully spoon the batter over the peaches and caramel, smoothing out the top. Bake at 350°F (175°C) for 35–40 minutes, or until a toothpick inserted into the center comes out clean.
6. Cool and Invert
Allow the cake to rest in the pan for 15–20 minutes after baking. Run a knife around the edges, then place a plate over the pan and flip carefully. Let gravity do its work. Remove the pan slowly to reveal your glossy peach crown.
Nutrition Information:
Amount Per Serving:Calories: 310Total Fat: 14gCarbohydrates: 42gSugar: 28gProtein: 4g
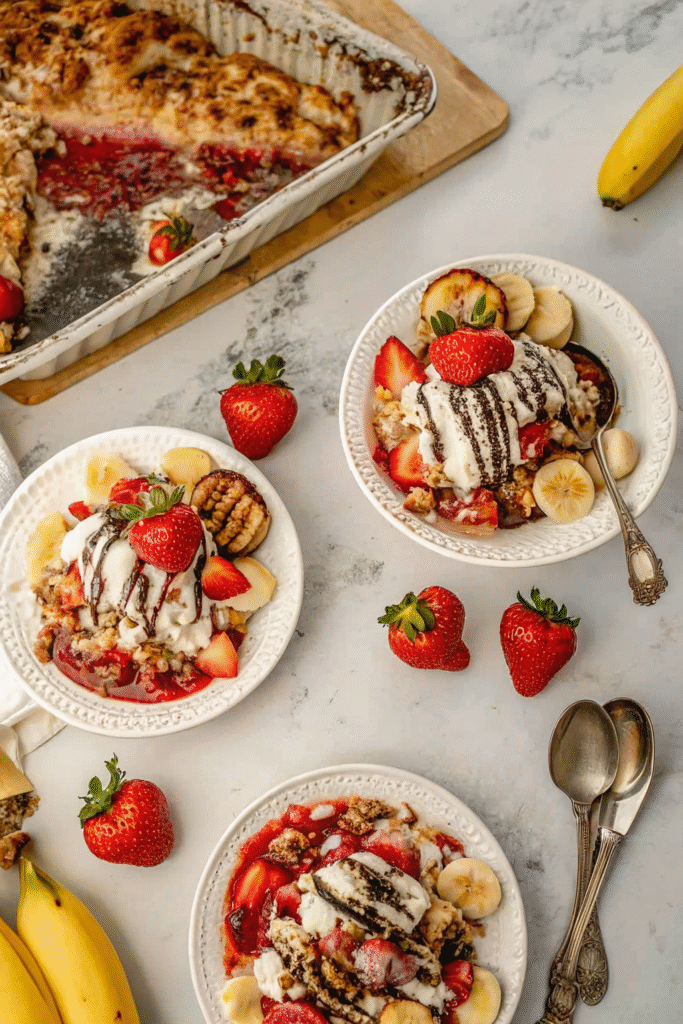
Experience the nostalgic delight of a classic banana split reimagined as a fuss-free dessert sensation—the Banana Split Dump Cake! This delectable creation combines layers of luscious strawberry pie filling, tangy pineapple, rich buttery cake mix, and melted butter, transforming into a golden, gooey delight reminiscent of a classic ice cream sundae. Inspired by the beloved dump cake trend—where ingredients are effortlessly “dumped” into a baking dish—this dessert is perfect for potlucks, family gatherings, or a quick, satisfying treat any day of the week. Praised by Allrecipes for its foolproof simplicity and mouthwatering results, this recipe is winning hearts and appetites everywhere.
The Magic Behind the Ingredients: A Deeper Dive
To craft the ultimate Banana Split Dump Cake, it’s essential to choose a perfectly balanced selection of ingredients that seamlessly blend to deliver its iconic flavor and irresistible texture.Each component plays a vital role, contributing to the cake’s moistness, sweetness, and overall appeal. Understanding the purpose of each ingredient can also help you make informed substitutions or experiment with variations.
For the Cake Base: The Foundation of Flavor
•1 (21 oz) can strawberry pie filling: This is the primary fruit layer, providing a sweet and slightly tart base that infuses the cake with a vibrant berry flavor. The pie filling’s gel-like consistency helps to keep the cake moist and adds to the gooey texture. While strawberry is traditional for a banana split, other fruit pie fillings like cherry or mixed berry could offer interesting variations.
•1 (20 oz) can crushed pineapple (with juice): Pineapple is a classic banana split component, and in this dump cake, it adds a tropical sweetness and essential moisture. The juice from the crushed pineapple is crucial as it helps to hydrate the dry cake mix during baking, contributing to the cake’s tender crumb. Do not drain the pineapple; the liquid is vital for the recipe’s success.
•1 (15.25 oz) box white cake mix: The dry cake mix is the star of the dump cake method. When combined with the fruit juices and melted butter, it transforms into a cake-like consistency without the need for separate mixing bowls or additional wet ingredients. While white cake mix is recommended for its neutral flavor profile that allows the fruit flavors to shine, a yellow cake mix could also be used for a richer, more buttery taste. Avoid cake mixes with pudding in the mix, as they might alter the texture too much.
•¾ cup butter, sliced into thin pieces: Butter is essential for both flavor and texture. As it melts over the dry cake mix, it creates a rich, golden crust and helps to moisten the cake mix, ensuring it bakes evenly. The key is to slice the butter into thin, even pieces and distribute them uniformly over the entire surface of the cake mix. This prevents dry spots and ensures a consistent, delicious result. Unsalted butter is generally preferred for baking to control the overall saltiness of the dessert.
For Toppings: The Iconic Banana Split Experience
The toppings are what truly elevate this dessert from a simple fruit cake to a full-fledged Banana Split Dump Cake. They add layers of flavor, texture, and visual appeal, mimicking the beloved ice cream sundae.
•½ cup chopped walnuts or pecans: These nuts provide a delightful crunch and a nutty flavor that complements the sweetness of the fruit and cake. They add a textural contrast that is highly satisfying. If you have nut allergies or preferences, you can omit them or substitute with other chopped nuts like almonds, or even shredded coconut for a different tropical twist.
•Sliced bananas: Freshly sliced bananas are non-negotiable for a Banana Split experience. They add a creamy texture and their distinct sweet flavor. It’s best to add them just before serving to prevent them from browning. A little lemon juice can be tossed with the banana slices to slow down oxidation if preparing slightly in advance.
•Whipped cream or Cool Whip: A generous dollop of whipped cream or Cool Whip provides a light, airy, and creamy contrast to the rich cake. It’s a classic banana split topping that brings everything together. For a homemade touch, fresh whipped cream can be made with heavy cream, a touch of sugar, and vanilla extract.
•Chocolate syrup (for drizzling): A drizzle of chocolate syrup adds a touch of decadence and the quintessential chocolate flavor of a banana split. You can use store-bought syrup or make a simple homemade chocolate sauce for an extra special touch.
Each of these ingredients, from the base to the toppings, contributes to the overall success and deliciousness of the Banana Split Dump Cake, making it a truly irresistible dessert that’s surprisingly easy to make.
Timing & Servings: Efficiency Meets Indulgence
One of the most appealing aspects of the Banana Split Dump Cake, beyond its incredible flavor, is its remarkable efficiency in terms of preparation and cooking time. This dessert is designed for convenience, making it an ideal choice for busy individuals or those who want to whip up something impressive without spending hours in the kitchen.
•Prep Time: 10 minutes: This minimal preparation time is a hallmark of dump cakes. The beauty lies in the simplicity of layering ingredients directly into the baking pan. There’s no need for elaborate mixing, multiple bowls, or complex techniques. This makes it a perfect last-minute dessert option or a great recipe for involving children in the kitchen.
•Cook Time: 40 minutes: The baking time is relatively short, allowing the cake mix to transform into a tender, moist cake while the fruit fillings bubble and meld together. The oven does most of the work, creating a warm, inviting aroma that fills your home.
•Total Time: 50 minutes: From start to finish, you can have a warm, ready-to-serve dessert in under an hour. This quick turnaround is invaluable when entertaining guests or when a sudden craving for something sweet strikes.
•Servings: 12: This recipe yields a generous 12 servings, making it perfect for feeding a crowd. Whether it’s a family dinner, a potluck, or a party, this dump cake is designed to be shared. The substantial serving size also means you might have delicious leftovers for the next day, which can be just as delightful.
Step-by-Step Instructions: A Foolproof Path to Dessert Bliss
The simplicity of the Banana Split Dump Cake extends to its preparation, with straightforward steps that even novice bakers can follow with confidence. Each step is designed to be quick and easy, ensuring a successful outcome every time.
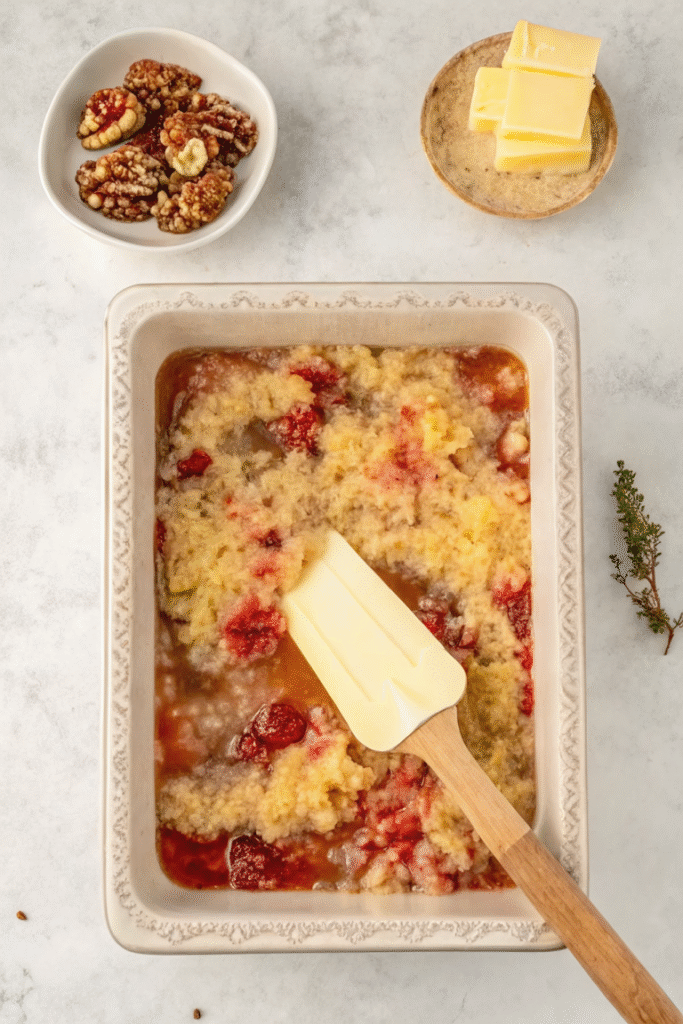
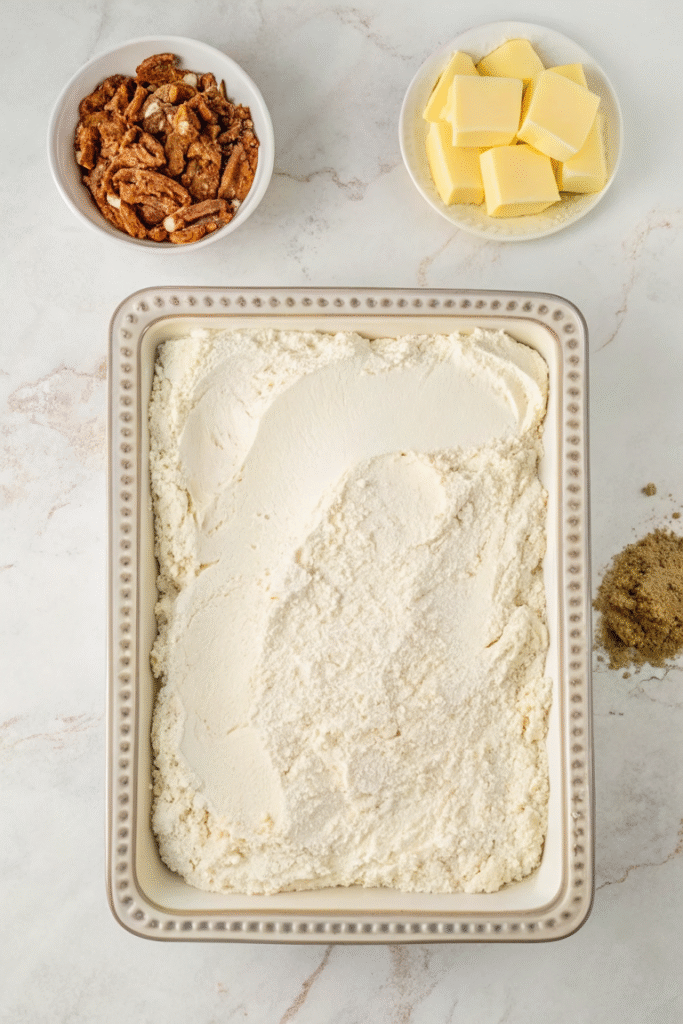
1.Preheat the Oven: Set to 350°F (175°C) and lightly grease a 9×13-inch baking pan with non-stick spray. Proper oven temperature is crucial for even baking and achieving that golden-brown crust. Greasing the pan ensures that the cake doesn’t stick and makes for easy serving. A 9×13-inch pan is the standard size for most dump cake recipes, providing ample surface area for the layers to cook perfectly.
2.Layer the Fillings: Spread the strawberry pie filling evenly in the pan. Pour the crushed pineapple (with juice) over the top. This is where the
magic begins. The fruit fillings create a moist and flavorful base. Spreading the strawberry pie filling evenly ensures that every slice gets a taste of this sweet and tart layer. The crushed pineapple, along with its juice, is then poured over the strawberry filling, adding another layer of flavor and, more importantly, the necessary liquid to hydrate the cake mix.
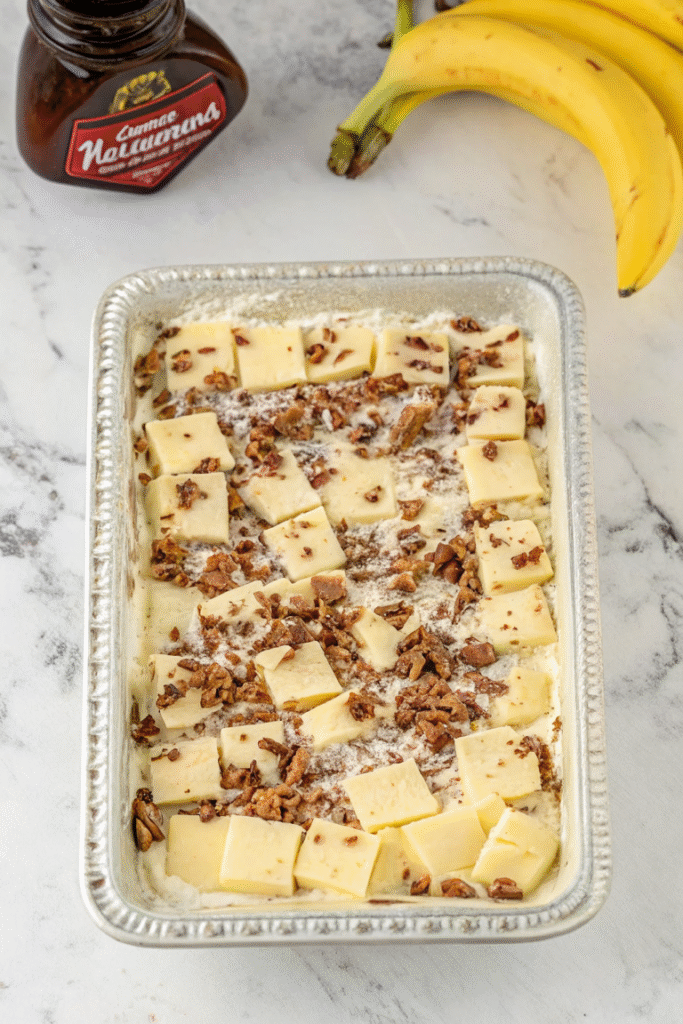
1.Add the Cake Mix: Sprinkle the dry cake mix over the fruit layer, covering it completely. This step is what gives the dump cake its name. Simply open the box of cake mix and sprinkle it evenly over the fruit layers. It’s important to cover the entire surface to create a uniform cake topping. Do not stir the cake mix into the fruit; it should remain as a distinct layer.
2.Top with Butter: Arrange the sliced butter pieces over the cake mix. Scatter chopped nuts on top. The butter is the final touch that brings everything together. As it melts in the oven, it seeps into the cake mix, creating a rich, buttery flavor and a golden, slightly crispy crust. The nuts, if using, add a delightful crunch and a toasted flavor that complements the sweetness of the cake. As noted by Serious Eats, the butter distribution is key—make sure slices are evenly placed to prevent dry spots.
3.Bake: Place in the oven for 35–40 minutes until golden brown. The cake will still be slightly jiggly—this is normal due to the fruit filling! The baking time is relatively short, but it’s important to keep an eye on the cake to prevent it from overbaking. The top should be a beautiful golden brown, and the fruit filling should be bubbly. The slight jiggle in the center is a sign that the cake is perfectly moist and gooey underneath.
4.Serve Warm: Top with sliced bananas, whipped cream, and chocolate syrup for the full Banana Split experience. This is the final, and perhaps most important, step. Serving the cake warm allows the flavors to meld together and creates a comforting, indulgent dessert. The classic banana split toppings—sliced bananas, whipped cream, and chocolate syrup—are what truly make this dessert special. The contrast of the warm cake with the cool, creamy whipped cream is simply irresistible.
By following these simple steps, you can create a delicious and impressive Banana Split Dump Cake that is sure to be a hit with family and friends. The foolproof nature of this recipe makes it a go-to for any occasion, from casual weeknight treats to special celebrations.
Nutritional Information: Understanding Your Indulgence
While the Banana Split Dump Cake is undeniably a treat, it’s helpful to understand its nutritional breakdown, especially if you’re mindful of your dietary intake. Knowing the caloric and macronutrient content can help you enjoy this dessert responsibly and fit it into your overall eating plan. It’s important to remember that these values are approximate and can vary slightly based on specific brands of ingredients used and portion sizes.
Nutritional Information (Per Serving – approximate for 12 servings):
•Calories: 360 kcal: This indicates the energy provided by each serving. While it’s a higher calorie dessert, portion control is key. Enjoying a single serving can be a satisfying way to indulge without overdoing it.
•Fat: 16 g: This includes fats from the butter, and potentially from the cake mix and any added nuts. Fats are essential for energy and nutrient absorption, but moderation is important.
•Protein: 3 g: While not a high-protein dessert, the small amount of protein comes from the cake mix and any nuts added. For those looking to increase protein intake, this dessert would typically be paired with a protein-rich meal.
•Carbohydrates: 52 g: The majority of carbohydrates come from the fruit fillings and the cake mix. These provide energy for your body.
•Fiber: 2 g: Fiber is beneficial for digestive health and helps with satiety. The fiber content primarily comes from the fruit.
•Sugar: 33 g: This includes natural sugars from the fruit and added sugars from the pie filling and cake mix. Being mindful of sugar intake is important for overall health.
•Sodium: 353 mg: The sodium content comes from various ingredients, including the cake mix and potentially the canned fruits. For those monitoring sodium, this is a factor to consider.
Understanding these values allows you to make informed choices. For instance, if you’re planning to enjoy a slice of Banana Split Dump Cake, you might adjust other meals during the day to balance your intake of calories, fats, and sugars.
For those who love the concept of the Banana Split Dump Cake but are looking for ways to reduce its caloric or sugar content, or to accommodate specific dietary needs, there are several delicious and easy modifications you can make. These healthier alternatives allow you to enjoy the essence of this delightful dessert with a lighter touch.
•Gluten-Free: The easiest swap for a gluten-free version is to use a gluten-free cake mix. Many brands now offer excellent gluten-free options that perform similarly to traditional cake mixes. Ensure all other ingredients, especially any processed ones, are also certified gluten-free if cross-contamination is a concern.
•Lower Sugar: To reduce the sugar content, opt for sugar-free pie filling and pineapple canned in its own juice or water with no added sugar. You can also choose a cake mix that is lower in sugar or use a sugar substitute in the cake mix if you are making it from scratch. Additionally, consider reducing the amount of chocolate syrup or using a sugar-free version.
•Vegan: Making this dump cake vegan is entirely possible with a few simple substitutions:
•Plant-based butter: Replace traditional butter with a high-quality plant-based butter alternative. Many brands offer vegan butter sticks that melt and bake similarly to dairy butter.
•Vegan whipped cream: Instead of dairy whipped cream or Cool Whip, use a plant-based whipped topping made from coconut cream, almond milk, or soy milk. These are readily available in most grocery stores.
•Vegan cake mix: Ensure the white cake mix you choose is vegan. Some cake mixes contain dairy or egg products, so always check the ingredient list carefully. Alternatively, you can make a simple vegan cake batter from scratch.
•Increased Fiber: To boost the fiber content, consider adding a layer of oatmeal (quick-cooking or rolled oats) over the fruit before sprinkling the cake mix. This will add a chewy texture and increase the dietary fiber. You could also use a whole wheat cake mix if you prefer.
•Reduced Fat: While butter is crucial for the texture, you could experiment with reducing the amount slightly or using a lighter butter alternative. However, be cautious as this might affect the cake’s moisture and texture. Using unsweetened applesauce as a partial fat substitute in the cake mix (if making from scratch) is another option.
These alternatives demonstrate the versatility of the Banana Split Dump Cake, allowing you to tailor it to your dietary preferences without compromising on flavor or the fun of this easy-to-make dessert.
Serving Ideas: Elevating Your Banana Split Dump Cake Experience
The Banana Split Dump Cake is a showstopper on its own, but the way you serve it can elevate the experience from simply delicious to truly unforgettable. Drawing inspiration from the classic ice cream sundae, there are numerous ways to customize and enhance each serving, making it a personalized treat for every guest. The Food Network suggests pairing this dessert with a scoop of vanilla ice cream for extra decadence, and this is just the beginning of the possibilities.
Classic Pairings and Beyond:
•Vanilla Ice Cream: A timeless choice, a scoop of good quality vanilla ice cream melts slightly into the warm cake, creating a creamy, dreamy contrast that mimics the traditional banana split. The simplicity of vanilla allows the cake’s vibrant fruit flavors to shine.
•Other Ice Cream Flavors: Don’t limit yourself to vanilla! Consider pairing with strawberry ice cream to amplify the berry notes, or even a rich chocolate ice cream for a more indulgent combination. A banana-flavored ice cream could also create a delightful, cohesive flavor profile.
•Custard or Crème Anglaise: For a more sophisticated presentation, a warm, silky custard or crème anglaise can add a luxurious touch. Its smooth texture and delicate sweetness would complement the cake beautifully.
Fun and Festive Toppings:
Beyond the essential bananas, whipped cream, and chocolate syrup, a variety of additional toppings can add visual appeal, texture, and bursts of flavor. These are perfect for customizing individual servings or setting up a dessert bar where guests can create their own masterpieces.
•Maraschino Cherries: The quintessential banana split garnish, a bright red maraschino cherry on top adds a pop of color and a touch of nostalgic sweetness. They are a must-have for an authentic look.
•Sprinkles: Colorful sprinkles, whether rainbow or chocolate, instantly add a festive and playful touch, especially appealing to younger guests or for celebratory occasions. They contribute a subtle crunch and a burst of visual excitement.
•Caramel Drizzle: For those who love a richer, buttery sweetness, a drizzle of warm caramel sauce can be a fantastic addition. It pairs wonderfully with the banana and chocolate flavors, adding another layer of complexity.
•Chopped Nuts (Extra): If you’re a nut lover, an extra sprinkle of chopped walnuts or pecans on top of the whipped cream can provide an additional textural element and nutty flavor. Toasted nuts can enhance their aroma and crunch.
•Toasted Coconut Flakes: For a tropical twist, lightly toasted coconut flakes can add a delightful chewiness and a subtle coconut flavor that complements the pineapple in the cake.
•Fresh Berries: While the cake already contains strawberry filling, a few fresh raspberries, blueberries, or sliced strawberries on top can add a burst of fresh fruit flavor and a beautiful garnish.
•Mini Chocolate Chips: A scattering of mini chocolate chips can add extra chocolatey goodness and a delicate crunch, especially if you’re a true chocoholic.
•Crushed Cookies or Wafers: Crushed vanilla wafers, graham crackers, or even chocolate cookies can add a delightful textural contrast and a different flavor dimension. Consider a sprinkle of crushed Nilla Wafers for a classic banana pudding vibe.
Presentation Matters:
Even with a simple dump cake, presentation can make a big difference. Serve individual slices on dessert plates, allowing ample space for toppings. A small mint sprig or a dusting of cocoa powder can add a professional touch. For a more casual setting, you can serve it directly from the baking dish, allowing guests to scoop their desired portion and add toppings.
By offering a variety of toppings and encouraging personalization, you can turn the serving of your Banana Split Dump Cake into an interactive and memorable experience, ensuring everyone finds their perfect combination of flavors and textures.
Common Mistakes to Avoid: Ensuring Your Dump Cake is a Triumph
The Banana Split Dump Cake is celebrated for its simplicity, but even with the easiest of recipes, a few common pitfalls can stand between you and dessert perfection. By being aware of these potential mistakes, you can ensure your dump cake turns out flawlessly every time, with the ideal texture, flavor, and appearance.
1. Overbaking: The Enemy of a Gooey, Moist Cake
One of the most frequent errors in making a dump cake is overbaking it. Unlike traditional cakes where a completely firm center is the goal, a dump cake is designed to be soft, gooey, and slightly underdone in the center. This is due to the high moisture content from the fruit fillings.
•The Mistake: Waiting for the cake to be completely firm or for a toothpick to come out perfectly clean from the center. This will result in a dry, overcooked cake that lacks the signature gooey texture.
•The Solution: Bake until the top is a beautiful golden brown and the edges are bubbly. The center should still have a slight jiggle to it. This indicates that the fruit fillings are hot and bubbly, and the cake is perfectly cooked. Trust the visual cues and the recommended baking time, and don’t be afraid to take it out of the oven when it still looks a little soft in the middle. It will continue to set as it cools.
2. Uneven Butter Slices: The Cause of Dry, Powdery Patches
The distribution of butter over the dry cake mix is a critical step that directly impacts the final texture of the cake. The melting butter is what moistens the cake mix and creates that desirable golden crust.
•The Mistake: Placing thick, uneven slices of butter on top of the cake mix, or leaving large gaps between the butter slices. This will lead to dry, powdery patches of cake mix where the butter didn’t reach, and overly greasy spots where the butter pooled.
•The Solution: Slice the butter into thin, even pieces and distribute them as uniformly as possible over the entire surface of the cake mix. Think of it as creating a mosaic of butter that will melt evenly and cover the entire cake. Some bakers even prefer to melt the butter and drizzle it evenly over the top, which can also be an effective method.
3. Skipping the Toppings: Missing the Essence of the Banana Split
While the cake itself is delicious, the toppings are what truly transform it into a Banana Split Dump Cake. Skipping them can leave you with a tasty fruit dump cake, but it won’t capture the full, nostalgic experience of the classic sundae.
•The Mistake: Serving the cake plain, without the sliced bananas, whipped cream, and chocolate syrup. This misses the opportunity to add layers of flavor, texture, and visual appeal that are essential to the recipe’s theme.
•The Solution: Embrace the full banana split experience! Have fresh bananas, whipped cream (or a non-dairy alternative), and chocolate syrup ready to go when the cake comes out of the oven. The contrast of the warm, gooey cake with the cool, creamy toppings is what makes this dessert so special. Encourage guests to add their own toppings for a fun, interactive dessert experience.
4. Not Using the Pineapple Juice: A Recipe for a Dry Cake
The juice from the canned crushed pineapple is a crucial ingredient that provides the necessary moisture to hydrate the dry cake mix. Draining the pineapple is a common mistake that can lead to a dry, crumbly cake.
•The Mistake: Draining the juice from the crushed pineapple before adding it to the baking pan. This removes a significant amount of liquid that is needed to create the cake’s tender texture.
•The Solution: Always use the crushed pineapple with its juice. Pour the entire contents of the can over the strawberry pie filling. This ensures that there is enough liquid to interact with the dry cake mix and create a moist, delicious cake.
5. Stirring the Ingredients: Defeating the Purpose of a Dump Cake
The beauty of a dump cake lies in its layered,
unmixed nature. The magic happens in the oven as the ingredients meld together.
•The Mistake: Stirring the ingredients together in the baking pan. This disrupts the layering process and can result in a dense, heavy cake with a less appealing texture.
•The Solution: Resist the urge to stir! Simply layer the ingredients as instructed: fruit fillings first, then the dry cake mix, and finally the butter. This allows the cake to bake as intended, with a distinct fruit layer and a tender cake topping.
By avoiding these common mistakes, you can ensure that your Banana Split Dump Cake is a resounding success, delighting everyone with its perfect balance of flavors, textures, and nostalgic charm.
Storage & Make-Ahead Tips: Convenience for Every Occasion
One of the many advantages of the Banana Split Dump Cake is its versatility when it comes to storage and make-ahead options. This makes it an excellent choice for meal prepping desserts, entertaining, or simply ensuring you always have a delicious treat on hand. Knowing how to properly store your dump cake will help maintain its freshness and flavor for days, or even months.
Short-Term Storage: Room Temperature
•Best served fresh, but can sit covered for up to 2 days at room temperature. While the cake is undeniably at its best when warm and fresh from the oven, it can be stored at room temperature for a short period. Ensure it is tightly covered with plastic wrap or aluminum foil to prevent it from drying out. Keep in mind that the fresh banana slices added as a topping are best consumed immediately, as they will brown over time. If storing at room temperature, it’s best to add the fresh banana slices, whipped cream, and chocolate syrup just before serving each portion.
Medium-Term Storage: Refrigeration
•Store leftovers for 3–4 days in the refrigerator. For slightly longer storage, the refrigerator is your best friend. Once the cake has cooled completely, cover the baking pan tightly with plastic wrap or transfer individual slices to an airtight container. Refrigeration helps to slow down spoilage and keeps the cake moist. Again, add fresh toppings only when ready to serve. The texture of the cake might become a bit firmer when chilled, but it will still be delicious.
Long-Term Storage: Freezing
•Freeze slices in an airtight container for up to 2 months. This is a fantastic option for enjoying your dump cake long after it’s baked. Freezing allows you to portion out the cake and enjoy it whenever a craving strikes, without having to bake a whole new one.
1.Cool Completely: Before freezing, ensure the cake is entirely cooled. Freezing warm cake will create condensation, leading to ice crystals and a soggy texture upon thawing.
2.Portion and Wrap: Cut the cake into individual serving sizes. Wrap each slice tightly in plastic wrap, then in aluminum foil. This double layer of protection helps prevent freezer burn and preserves the cake’s flavor and moisture.
3.Airtight Container: Place the wrapped slices in a freezer-safe, airtight container or a heavy-duty freezer bag. Remove as much air as possible from the bag before sealing.
4.Label and Date: Label the container or bag with the date of freezing to keep track of its freshness.
Make-Ahead Tips:
•Assemble and refrigerate before baking (up to 24 hours ahead). This is a game-changer for entertaining or busy days. You can prepare the entire dump cake, layering all the ingredients (except for the fresh banana, whipped cream, and chocolate syrup), cover it tightly, and refrigerate it. When you’re ready to bake, simply pop it into the preheated oven and add the fresh toppings after baking. This allows you to do most of the work in advance, leaving you with more time to enjoy your event or relax.
By utilizing these storage and make-ahead strategies, you can maximize the convenience and enjoyment of your Banana Split Dump Cake, ensuring that this delightful dessert is always a hassle-free option.
Conclusion: Your New Go-To Easy Dessert
This Banana Split Dump Cake is truly the ultimate hassle-free dessert—perfect for any occasion! We’ve explored every facet of this delightful treat, from its simple yet effective ingredient list to its straightforward preparation, making it accessible to even the most novice bakers. The magic of the dump cake lies in its ability to transform basic pantry staples into a warm, gooey, and incredibly flavorful dessert with minimal effort.
We’ve delved into the specific roles each ingredient plays, highlighting how the strawberry pie filling and crushed pineapple create a moist, fruity base, while the dry cake mix and butter magically combine to form a tender, cake-like topping. The classic banana split toppings—fresh bananas, whipped cream, and chocolate syrup—are not just garnishes; they are essential components that complete the nostalgic experience, turning a simple baked good into a celebratory dessert.
Furthermore, we’ve provided comprehensive guidance on nutritional information, allowing you to enjoy this indulgence mindfully, and offered practical healthier alternatives for those with specific dietary needs or preferences. The detailed step-by-step instructions ensure a foolproof baking process, while the insights into common mistakes to avoid will help you achieve perfect results every time. Finally, our storage and make-ahead tips empower you to enjoy this delicious creation at your convenience, whether it’s fresh from the oven or a delightful treat saved for later.
This Banana Split Dump Cake is more than just a recipe; it’s an invitation to simplify your baking, embrace delicious flavors, and create memorable moments with family and friends. Its adaptability, ease of preparation, and crowd-pleasing appeal make it an indispensable addition to your dessert repertoire. So, go ahead, gather your ingredients, and whip up this delightful Banana Split Dump Cake—it’s guaranteed to be a crowd-pleaser! We encourage you to give it a try and let us know in the comments how yours turned out. Looking for more easy dessert ideas? Check out our guide to Best Dump Cake Recipes for more inspiration.
Frequently Asked Questions (FAQs)
To further assist you in mastering the Banana Split Dump Cake, here are answers to some frequently asked questions that often arise during preparation or when considering variations:
Q: Can I use fresh fruit instead of canned? A: While it is possible to use fresh fruit, especially bananas for topping, using canned fruit for the base layers is highly recommended for this recipe. Canned crushed pineapple, in particular, ensures the proper moisture content needed to hydrate the dry cake mix effectively. Fresh strawberries, for example, may release too much liquid during baking, potentially altering the cake’s texture and consistency. If you do opt for fresh fruit in the base, be prepared to adjust the liquid content accordingly, perhaps by reducing the amount of pineapple juice or adding a bit more cake mix to absorb excess moisture. However, for a foolproof and consistent result, sticking to canned fruit as specified is best.
Q: Can I make this ahead of time? A: Absolutely! This is one of the great advantages of dump cakes. You can assemble the entire cake, layering all the ingredients (excluding the fresh banana slices, whipped cream, and chocolate syrup for topping), cover it tightly with plastic wrap or aluminum foil, and refrigerate it for up to 24 hours before baking. This makes it an excellent option for entertaining, as you can do most of the prep work in advance and simply pop it into the oven when your guests arrive. Just remember to bring it to room temperature for about 15-30 minutes before baking to ensure even cooking.
Q: What if I don’t have nuts? A: No problem at all! The chopped walnuts or pecans are primarily for added texture and a nutty flavor, but they are entirely optional. If you don’t have nuts, or if you have a nut allergy, you can simply skip them. Alternatively, you can substitute them with other ingredients to add a different textural element. Shredded coconut, for example, can provide a lovely chewiness and a subtle tropical flavor that complements the pineapple. You could also try adding a sprinkle of granola for crunch, or even mini chocolate chips for extra indulgence.
Q: Can I use a different flavor of cake mix? A: Yes, you can! While white cake mix is recommended for its neutral flavor that allows the fruit to shine, you can certainly experiment with other flavors. A yellow cake mix would add a richer, buttery note, while a vanilla or even a spice cake mix could offer interesting variations. Just be mindful that stronger flavored cake mixes might slightly overshadow the delicate fruit flavors. Avoid chocolate cake mix if you want to maintain the traditional banana split flavor profile.
Q: How do I know when the cake is done? A: The key indicator is a golden-brown top and bubbly fruit filling around the edges. The center will still be slightly jiggly, and this is perfectly normal and desired for a dump cake, as it indicates a moist, gooey interior. Unlike traditional cakes, a toothpick inserted into the center may not come out completely clean due to the fruit filling. Rely more on the visual cues of the golden top and bubbly edges.
Q: Can I make individual servings? A: Yes, you can! Instead of a 9×13-inch baking pan, you can use individual ramekins or muffin tins. Adjust the baking time accordingly, as smaller portions will cook faster. This is a great way to create single-serving desserts for portion control or for a more elegant presentation.
Q: What are some other dump cake variations? A: The dump cake concept is incredibly versatile! You can experiment with various fruit fillings (cherry, peach, apple), different cake mix flavors (chocolate, lemon, spice), and a variety of toppings. Some popular variations include Peach Cobbler Dump Cake, Cherry Pineapple Dump Cake, and Apple Cinnamon Dump Cake. The possibilities are endless, making dump cakes a fun and easy dessert category to explore.
Now, go whip up this Banana Split Dump Cake—it’s guaranteed to be a crowd-pleaser! 🍌🍍🍰
Banana Split Dump Cake: The Ultimate Easy Dessert Recipe
Discover the ultimate easy Banana Split Dump Cake recipe! Layers of fruit, cake mix, and butter create a gooey, golden dessert perfect for any occasion.
Prep Time10 minutes
Cook Time40 minutes
Additional Time50 minutes
Total Time1 hour40 minutes
Ingredients
1 (21 oz) can strawberry pie filling
1 (20 oz) can crushed pineapple with juice
1 (15.25 oz) box white cake mix
3/4 cup butter (cut into small slices)
1/2 cup chopped nuts (walnuts or pecans)
sliced bananas
whipped cream, cool whip (or ice cream is also tasty!)
chocolate syrup
Instructions
Heat the oven to 350°F and spray a 9x13-inch pan with cooking spray.
Spread the strawberry pie filling in the pan. Add the pineapple over the strawberry filling.
Pour the cake mix evenly over the filling and add butter slices over the cake mix. Sprinkle with nuts.
Place in the oven and bake for 35-40 minutes, until golden. The cake will be a but jiggly from the filling - don't worry, that's normal!
Serve warm with ice cream, sliced bananas, chocolate syrup, or any other toppings you like.
Recipe: Flourless Protein Muffins (Inspired by Eating Bird Food)
Tips for Preparation and Storage
Conclusion
References
In today’s busy lifestyle, finding breakfast options that are nutritious, delicious, and easy to prepare can be a challenge. We often resort to quick fixes that, while satisfying hunger momentarily, lack the nutritional value needed to keep us energized and satiated for hours. This is where protein muffins come into play, offering an ideal alternative for those looking to optimize their diet without sacrificing taste or convenience. These small, versatile bites are not only incredibly practical for on-the-go, but they are also packed with essential nutrients, especially protein, which is fundamental for muscle building, satiety, and overall well-being. In this article, we will delve deep into the world of protein muffins, from their countless benefits and the key ingredients that make them so special, to a detailed recipe so you can prepare them at home, and practical tips for their storage. Get ready to transform your mornings and discover how a simple muffin can become your perfect ally for a healthier, more energetic lifestyle.
Why Choose Protein Muffins?
Protein muffins have gained immense popularity in recent years, and it’s not hard to understand why. Beyond being a delicious and convenient option, they offer a range of benefits that make them a smart choice for anyone looking to improve their diet and lifestyle. The key to their appeal lies in their high protein content, a vital macronutrient that plays a crucial role in almost all bodily functions [1].
Key Benefits of Protein
Protein is much more than just a component for muscle building; it is a fundamental pillar for overall health. Here are some of its most important benefits:
•Muscle Development and Repair: For athletes, fitness enthusiasts, or simply those looking to maintain healthy muscle mass, protein is indispensable. It helps repair damaged muscle fibers after exercise and build new muscle tissue, which is essential for strength and recovery [2].
•Satiety and Weight Management: One of the biggest challenges in any eating plan is appetite control. Protein is known for its ability to increase feelings of fullness, meaning you’ll feel satisfied for longer and, therefore, are less likely to resort to unhealthy snacking. This can be a great ally in weight management or loss [3].
•Accelerated Metabolism: The body expends more energy digesting proteins than carbohydrates or fats, a phenomenon known as the thermic effect of food. This can contribute to a more active metabolism, helping to burn more calories throughout the day.
•Bone Health: Contrary to some myths, adequate protein intake is beneficial for bone health. It works in conjunction with calcium and vitamin D to maintain strong bones and reduce the risk of osteoporosis [4].
•Immune Function: Proteins are essential components of antibodies and other immune system molecules. Sufficient intake helps strengthen the body’s defenses against infections and diseases.
•Blood Sugar Stabilization: Consuming protein along with carbohydrates can help slow down glucose absorption, preventing sharp spikes and drops in blood sugar levels. This is particularly useful for maintaining stable energy levels and preventing cravings.
Who Are Protein Muffins Ideal For?
Protein muffins are a versatile option that suits a wide range of people and lifestyles:
•Athletes and Sports Enthusiasts: They are an excellent post-workout snack for muscle recovery or a source of energy before physical activity.
•People with an Active Lifestyle: For those with busy schedules, protein muffins offer a quick and nutritious solution for breakfast or a mid-morning or afternoon snack.
•Individuals on Weight Management Plans: Thanks to their ability to promote satiety, they are a useful tool for controlling hunger and reducing total caloric intake.
•People Looking for Healthy Breakfast Options: If you’re tired of traditional sugar-laden breakfasts and want something more nutritious, protein muffins are a fantastic alternative.
•Children and Adolescents: They are a delicious way to ensure that young people get enough protein for their growth and development.
•Anyone Looking to Increase Their Protein Intake: If you struggle to meet your daily protein requirements, these muffins are a tasty and easy way to supplement your diet.
In summary, protein muffins are not just a passing fad; they are a practical and nutritious solution that perfectly aligns with the needs of a modern, health-conscious lifestyle. Their versatility and the multiple benefits they provide make them an indispensable element in the kitchen of anyone who values nutrition and convenience.
Key Ingredients and Smart Substitutions
The beauty of protein muffins lies in their flexibility. While there are basic ingredients that form the structure and nutritional profile, many of them can be adapted or substituted according to your dietary preferences, availability, or simply to experiment with new flavors. Knowing these ingredients and their possible alternatives will allow you to customize your muffins and make them even more attractive and nutritious.
Protein Powder: The Heart of the Protein Muffin
The star ingredient, of course, is protein powder. There are various sources, each with its own characteristics:
•Whey Protein: This is the most common and versatile. It digests quickly and is rich in essential amino acids, ideal for muscle recovery. For baking, unflavored or neutral-flavored (like vanilla) whey proteins are usually best, as they don’t drastically alter the final taste of the muffin. It’s important to note that some whey proteins can dry out baked goods a bit, so it’s sometimes necessary to adjust the recipe’s moisture.
•Casein: Digests more slowly than whey, providing a sustained release of amino acids. It can make baked goods denser.
•Plant-Based Protein: For vegans or those with dairy intolerance, plant-based proteins (pea, brown rice, hemp, soy) are excellent options. Often, a blend of plant proteins offers a more complete amino acid profile. Some plant proteins may have a more pronounced flavor or a grittier texture, so it’s advisable to try different brands to find the one that best suits your taste and baking needs.
Tip for Baking with Protein Powder: Protein powder does not behave the same as traditional flour. It absorbs more liquid and can make baked goods dry or gummy if the recipe is not adjusted. If you are adapting an existing recipe, consider replacing only a portion of the flour with protein powder (e.g., 1/4 to 1/3 of the total flour amount) and add a little more liquid if the dough seems too thick. [5]
Sources of Carbohydrates and Fiber
For the base of the muffins, healthy flours that provide fiber and nutrients are usually used:
•Oat Flour: This is a popular option due to its fiber content, mild flavor, and ability to create a moist texture. You can make it at home by grinding rolled oats in a food processor or blender until you get a flour consistency. It is naturally gluten-free (make sure the oats are certified gluten-free if necessary).
•Almond Flour: Provides healthy fats and a slightly sweet flavor. It is low in carbohydrates and gluten-free, but can make muffins denser.
•Whole Wheat Flour: A more nutritious option than white flour, with more fiber and nutrients. It can make muffins a bit denser.
•Fruit Purees (Banana, Apple, Pumpkin): In addition to providing natural sweetness, these purees add moisture and fiber to the dough, reducing the need for added sugars and fats. Ripe banana is especially popular in protein muffins for its sweetness and its ability to bind ingredients.
Healthy Fats and Moisture
These ingredients are crucial for texture and flavor:
•Peanut Butter (or any other nut butter): Provides healthy fats, additional protein, and a delicious flavor. Contributes to the moisture and density of the muffins.
•Greek Yogurt: It is an excellent source of protein and adds incredible moisture to muffins, plus a slight acidic touch that balances flavors. Plain unsweetened yogurt is the best option.
•Eggs: Act as binders and provide structure and moisture. You can use whole eggs or just egg whites to reduce fat.
•Healthy Oils (Coconut, Mild Olive, Avocado): Provide moisture and help keep muffins tender. Coconut oil is popular for its neutral flavor and health benefits.
Sweeteners and Flavorings
For sweetness and the finishing touch:
•Natural Sweeteners (Honey, Maple Syrup, Dates): These are healthier alternatives to refined sugar. The amount can be adjusted to taste.
•Vanilla Extract: A classic that enhances the flavor of almost any muffin.
•Spices (Cinnamon, Nutmeg): Add depth of flavor and aroma.
•Chocolate Chips, Nuts, Fruits (Blueberries, Raspberries): To add texture, flavor, and additional nutrients. Sugar-free chocolate chips or chopped dark chocolate are excellent options.
By understanding the function of each ingredient, you can experiment and create your own versions of protein muffins, adapting them to your specific needs and tastes. The key is to maintain a balance between macronutrients to ensure they remain a nutritious and delicious option.
Recipe: Flourless Protein Muffins (Inspired by Eating Bird Food)
This recipe, inspired by Eating Bird Food’s popular version, is incredibly simple to prepare and uses ingredients you probably already have in your pantry. The key to its ease is that all ingredients are blended together, minimizing preparation time and cleanup. They are perfect for a busy morning or for preparing in advance!
•2 large ripe bananas (approximately 1 cup mashed banana)
•2 large eggs
•1/2 cup plain unsweetened Greek yogurt
•1/4 cup milk (can be almond milk, cow’s milk, etc.)
•1/4 cup natural peanut butter (or any other nut butter)
•1 teaspoon vanilla extract
•1/2 cup protein powder (vanilla or unflavored, preferably whey or plant-based)
•1/2 cup oat flour (oats ground into flour consistency)
•1 teaspoon ground cinnamon (optional)
•1 teaspoon baking powder
•1/2 teaspoon baking soda
•1/4 teaspoon salt
•1/2 cup dark chocolate chips (or to taste, you can use blueberries, nuts, etc.)
Instructions:
1.Preheat and Prepare: Preheat your oven to 175°C (350°F). Line a 12-cup muffin tin with paper or silicone liners. If not using liners, lightly grease the tin.
2.Blend Wet Ingredients: In a high-speed blender, combine the ripe bananas, eggs, Greek yogurt, milk, peanut butter, and vanilla extract. Blend until smooth and homogeneous. Make sure there are no banana chunks.
3.Add Dry Ingredients: Add the protein powder, oat flour, cinnamon (if using), baking powder, baking soda, and salt to the blender. Blend again until all ingredients are well incorporated and the batter is uniform. Do not overblend, just until combined.
4.Fold in Chocolate Chips: Remove the blender jar and, with a spatula or spoon, gently fold in the chocolate chips (or your chosen additional ingredient). Mix just until evenly distributed.
5.Fill Muffin Cups: Divide the batter evenly among the 12 prepared muffin cups. You can fill them almost to the top, as they won’t rise as much as traditional muffins.
6.Bake: Bake for 18 to 20 minutes, or until a toothpick inserted into the center of a muffin comes out clean. Baking time may vary slightly depending on your oven.
7.Cool: Let the muffins cool in the tin for about 5 minutes before transferring them to a wire rack to cool completely. This helps them set and makes them easier to handle.
Enjoy these delicious and nutritious protein muffins as a healthy breakfast, snack, or dessert! They are an excellent way to incorporate more protein into your diet in a tasty and convenient way.
Recipe Notes:
•Variations: Feel free to experiment with different additions such as fresh or frozen blueberries, chopped nuts, shredded coconut, or even a little orange or lemon zest for a citrusy kick.
•Protein Powder: The quality and type of protein powder can affect the final texture. If your muffins turn out too dry, next time you can add an extra tablespoon of yogurt or mashed banana.
•Sweetness: If you prefer your muffins sweeter, you can add a tablespoon of honey or maple syrup to the blender mixture, adjusting to taste.
Tips for Preparation and Storage
Properly preparing and storing your protein muffins is key to ensuring they stay fresh, delicious, and ready to eat when you need them. Here are some practical tips to optimize their preparation and extend their shelf life:
Tips for Preparation:
•Do Not Overmix: One of the most common mistakes when baking muffins is overmixing the batter. This can develop gluten in the flour (even in oat flour, if processed too much) and result in tough, gummy muffins. Mix only until the dry ingredients are just combined with the wet ones. A few lumps are acceptable.
•Room Temperature Ingredients: For a more homogeneous mixture and even baking, it is advisable that ingredients like eggs and Greek yogurt are at room temperature. This helps them incorporate better with the rest of the components.
•Protein Powder Quality: As mentioned earlier, protein powder can affect the texture. If you find your muffins are dry, try using a different protein powder or adjust the amount of liquid in the recipe. Whey proteins tend to absorb more liquid than plant-based ones.
•Fill Muffin Liners Correctly: Fill the muffin liners evenly to ensure all muffins bake at the same rate. You can use an ice cream scoop or a measuring spoon for greater precision.
•Toothpick Test: Always trust the toothpick test. Insert a toothpick into the center of a muffin; if it comes out clean or with a few moist crumbs, they are ready. If it comes out with liquid batter, they need a few more minutes.
•Proper Cooling: Let the muffins cool in the tin for a few minutes before transferring them to a wire rack. This allows them to set and prevents them from sticking to the tin. Cooling them completely on a wire rack prevents moisture from accumulating at the bottom and making them soggy.
Tips for Storage:
Proper storage is essential to maintain the freshness and prevent spoilage of your protein muffins. Here are the best practices:
•Room Temperature (Short Term): If you plan to consume the muffins within 2-4 days, you can store them in an airtight container at room temperature. It is crucial that the container is truly airtight to prevent them from drying out or absorbing odors. Some people place a slice of fresh white bread in the container to help absorb excess moisture and keep the muffins softer, although this may not be necessary if the container is airtight enough.
•Refrigeration (Medium Term): To extend their freshness for up to a week, store the muffins in an airtight container in the refrigerator. The low temperature helps slow down the growth of mold and bacteria. Make sure they are completely cool before refrigerating to avoid condensation.
•Freezing (Long Term): Protein muffins freeze exceptionally well, making them an excellent option for meal prep. To freeze them:
1.Make sure they are completely cool. Freezing them warm will create condensation and ice crystals.
2.Wrap each muffin individually in plastic wrap or aluminum foil. This helps prevent freezer burn and maintain their moisture.
3.Place the wrapped muffins in a large, airtight freezer bag or freezer-safe container. Remove as much air as possible.
4.They can be stored in the freezer for up to 3 months.
•Thawing and Reheating: To thaw, simply take the muffins out of the freezer and let them sit at room temperature for a few hours, or thaw them in the refrigerator overnight. If you want to warm them up, you can do so in the microwave for 15-30 seconds (depending on the power) or in a preheated oven at 175°C (350°F) for about 5-10 minutes, until they are warm and soft. This is especially useful if you prefer them warm.
By following these tips, you can enjoy your homemade protein muffins for longer, ensuring you always have a healthy and convenient breakfast or snack option on hand. Smart planning and storage are key to maintaining a nutritious lifestyle without extra effort.
Frequently Asked Questions (FAQ)
Here are answers to some of the most common questions about protein muffins:
Q: Can I use any type of protein powder for this recipe? A: While you can use most protein powders, whey or plant-based protein blends usually work best. Casein proteins can make muffins denser. Keep in mind that the flavor of your protein powder will influence the final taste of the muffins, so choose one you like or a neutral one.
Q: Can I substitute banana for another ingredient? A: Yes, banana adds sweetness and moisture. You can substitute it with unsweetened applesauce, pumpkin puree, or even sweet potato puree in the same amount. The flavor profile and sweetness may vary slightly.
Q: Are these muffins suitable for people on gluten-free diets? A: Yes, by using oat flour (make sure it is certified gluten-free oats) and not containing wheat flour, these muffins are naturally gluten-free. Always check the labels of all your ingredients to ensure they do not contain hidden gluten if you have a severe sensitivity or allergy.
Q: How can I make my muffins sweeter without adding sugar? A: You can increase the amount of ripe banana, add soaked and blended dates to the mixture, or incorporate a little natural sweetener like stevia or erythritol to taste. Sugar-free chocolate chips are also an excellent option for adding sweetness.
Q: Can I make these muffins vegan? A: Yes, to make them vegan, substitute the eggs with “flax eggs” (1 tablespoon ground flaxseed + 3 tablespoons water per egg, let sit for 5 minutes) and make sure to use a plant-based protein powder and vegan Greek yogurt. The milk should also be plant-based.
Q: What is the best way to reheat frozen muffins? A: You can reheat frozen muffins directly in the microwave for 30-60 seconds (or until warm), or in a preheated oven at 175°C (350°F) for 10-15 minutes. If you thaw them first at room temperature or in the refrigerator, the heating time will be shorter.
Q: Why did my muffins turn out dry/gummy? A: This can be due to several reasons: overmixing the batter, using too much protein powder in relation to liquids, or overbaking them. Make sure not to overmix, adjust the amount of protein if necessary, and monitor baking time with the toothpick test.
Conclusion
Protein muffins are much more than just a trend in the world of healthy eating; they are a practical, delicious, and highly nutritious solution to integrate more protein into your daily diet. Whether you are looking for a quick breakfast option for your busy mornings, a post-workout snack to optimize your muscle recovery, or simply a healthy alternative to traditional sweets, these versatile bites adapt perfectly to various needs and lifestyles.
Throughout this article, we have explored the countless benefits of protein, from its crucial role in muscle development and satiety to its positive impact on metabolism and bone health. We have broken down the key ingredients that make up these muffins, offering smart alternatives so you can customize them to your taste and dietary requirements. In addition, we have provided you with a simple and effective recipe so you can prepare your own flourless protein muffins at home, along with expert tips for their preparation and storage, ensuring that every bite is as fresh and delicious as the first.
Incorporating protein muffins into your routine will not only help you achieve your nutritional goals but also allow you to enjoy a more conscious and pleasant diet. They are proof that eating healthy doesn’t have to be boring or complicated. So, go ahead and experiment in your kitchen, discover your favorite combinations, and make protein muffins a pillar on your path to a more energetic and balanced lifestyle. Your body and your palate will thank you!
Protein Muffins: The Perfect Breakfast to Start Your Day with Energy
Prep Time10 minutes
Cook Time20 minutes
Additional Time12 minutes
Total Time42 minutes
Ingredients
•2 large ripe bananas (approximately 1 cup mashed banana)
•2 large eggs
•1/2 cup plain unsweetened Greek yogurt
•1/4 cup milk (can be almond milk, cow’s milk, etc.)
•1/4 cup natural peanut butter (or any other nut butter)
•1 teaspoon vanilla extract
•1/2 cup protein powder (vanilla or unflavored, preferably whey or plant-based)
•1/2 cup oat flour (oats ground into flour consistency)
•1 teaspoon ground cinnamon (optional)
•1 teaspoon baking powder
•1/2 teaspoon baking soda
•1/4 teaspoon salt
•1/2 cup dark chocolate chips (or to taste, you can use blueberries, nuts, etc.)
Instructions
1.Preheat and Prepare: Preheat your oven to 175°C (350°F). Line a 12-cup muffin tin with paper or silicone liners. If not using liners, lightly grease the tin.
2.Blend Wet Ingredients: In a high-speed blender, combine the ripe bananas, eggs, Greek yogurt, milk, peanut butter, and vanilla extract. Blend until smooth and homogeneous. Make sure there are no banana chunks.
3.Add Dry Ingredients: Add the protein powder, oat flour, cinnamon (if using), baking powder, baking soda, and salt to the blender. Blend again until all ingredients are well incorporated and the batter is uniform. Do not overblend, just until combined.
4.Fold in Chocolate Chips: Remove the blender jar and, with a spatula or spoon, gently fold in the chocolate chips (or your chosen additional ingredient). Mix just until evenly distributed.
5.Fill Muffin Cups: Divide the batter evenly among the 12 prepared muffin cups. You can fill them almost to the top, as they won’t rise as much as traditional muffins.
6.Bake: Bake for 18 to 20 minutes, or until a toothpick inserted into the center of a muffin comes out clean. Baking time may vary slightly depending on your oven.
7.Cool: Let the muffins cool in the tin for about 5 minutes before transferring them to a wire rack to cool completely. This helps them set and makes them easier to handle.
Notes
•Variations: Feel free to experiment with different additions such as fresh or frozen blueberries, chopped nuts, shredded coconut, or even a little orange or lemon zest for a citrusy kick.
•Protein Powder: The quality and type of protein powder can affect the final texture. If your muffins turn out too dry, next time you can add an extra tablespoon of yogurt or mashed banana.
•Sweetness: If you prefer your muffins sweeter, you can add a tablespoon of honey or maple syrup to the blender mixture, adjusting to taste.